|
|
Post by keurslagerkurt on Jan 8, 2021 9:44:46 GMT
Hi all! Recently I ordered two boards from AliExpress based on the ISD1820 recording chip. They contain a small microphone, three push buttons for recording & playback, and some pins to voltage control the recording, playback, etc. (I ordered these: www.aliexpress.com/item/32854056669.html?spm=a2g0s.9042311.0.0.5d4d4c4dfSY7Wp)A quick google search learned me that you can order exactly the same boards from a ton of different manufacturers, so there are also more ethical options than AliExpress around. Anyways, I was pleasantly suprised at how easy it was to make the small board work, and how well it talks with the AE. Connecting the small board is actually very easy and can as such be barely considered as DIY even haha. This is how I did it. 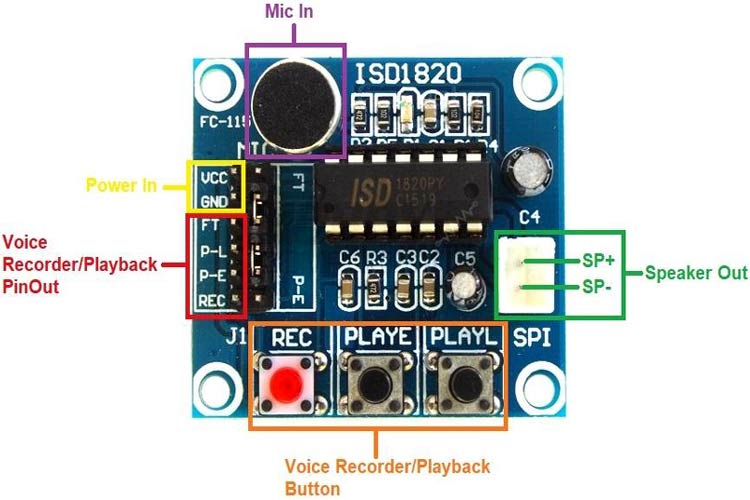 So I connected Power In Vcc to 5V of the AE and connected GND of the board & AE. For speaker out, it works perfectly if you just connect SP+ as an audio source in your AE (I connected it to my Wasp Filter input). I read in the online documentation that you should NOT connect SP- to ground by the way, so I leave this one unconnected. You can play with the other pins, as they are the voltage control of the recording and playback. But you can also just use the push buttons and leave the pins unconnected. They work as follows: FT: this should be the direct audio of your microphone, so you could sing/makenoise live without recording, but havent tested this one yet. P-L: Playback Level activated. When this input pin level transits for LOW to HIGH, a playback cycle is initiated. The playback will stop once the pin goes low again. So with eg a square wave you can control playback of the recording. P-E: Playback, Edge‐activated: When a HIGH‐going transition is detected continues until an End‐of‐Message (EOM) marker is encountered or the end of the memory space is reached. You can send a pulse or a gate here, and it will start playback of your rec. REC: The REC input is an active‐HIGH record signal. The module starts recording whenever REC is HIGH. This pin must remain HIGH for the duration of the recording. REC takes precedence over either playback (P-L or P-E) signal. Only downside was the board has male headers, so I need to buy some more male-female dupont cables. For now I solved my problem by using some female-female cables with the AE cables put on top. It looks possible to incorparate two of these small boards into two AE spaces, I'm thinking about just fixing them on top of a panel, as the microphone needs to be in the open.   I havent yet made any real 'module' or anything DIY for AE, so if people have some inspiration on how this could be fixed in a nice way, all inspiration is welcome. It would also be ideal to find a type of pin/headers set that i can put on top of the male headers of the mic board to convert it to female, as such i could easily patch. I was also thinking of soldering an extra, attenuated connection to the mic solder points, so I could record audio from the rack onto the chip & loop it. Here is a small first test of the mic through the AE delay module: And here I incorporate it into a bigger ambient jam: Attachments:

|
|
namke
wonkystuff
electronics and sound, what's not to like?!
Posts: 689
|
Post by namke on Jan 8, 2021 10:04:17 GMT
This looks great! Thanks keurslagerkurt . It looks like the chip itself is in a socket, is that true? It might be fun to make a schematic for the Braedboard module to expose some more 'features' ( for example, this datasheet says that by varying one of the resistors, the record/playback speed can be varied (sample rate at least). A nice find! |
|
|
|
Post by keurslagerkurt on Jan 8, 2021 12:12:12 GMT
This looks great! Thanks keurslagerkurt . It looks like the chip itself is in a socket, is that true? It might be fun to make a schematic for the Braedboard module to expose some more 'features' ( for example, this datasheet says that by varying one of the resistors, the record/playback speed can be varied (sample rate at least). A nice find! It is indeed socketed, cool idea! I was wondering whether it would be possible to alter the internal clock thingy (classic circuit bending stuff), would be fun to alter the playback speed of the recording. I see there is one pin of the IC labeled as 'XCLK' that goes to ground, could a voltage here maybe change the internal playback speed? As you said, it should be possible to change the sample rate and recording length by changing that one resistor, but I suppose it does not change playback speed. I'm also wondering whether its a discrete thing (something digital in the chip?) because the sample rate table with resistors seems like those are different options. But maybe testing with a pot in series with an 80K resistor could be fun. Wonder what happens if you change the resistance there in real time. I have two of these boards, so I can afford burning one for experiments haha. I hope I'll find some time to experiment this weekend! |
|
|
|
Post by onkelhoste on Jan 8, 2021 16:13:14 GMT
As far as i know: Replace R4 by a poti und you can vary the playback speed ...
|
|
|
|
Post by NightMachines on Jan 8, 2021 18:28:22 GMT
This looks really cool! I don’t want to buy more stuff (especially with a bunch of other DIY projects queueing up in my drawer), but I look forward to what you folks come up with. If the IC is easy to get in larger quantities, maybe even someone from the AEM manufacturers’ circle would make a proper module out of it?  I could imagine two of them in one module, patchable in a re-recording/feedback loop, which just cuts up or degrades audio with every cycle. |
|
|
|
Post by MikMo on Jan 8, 2021 23:44:37 GMT
Can you retrigger the playback while it is playing, or does it have to play to end before it can start over ?
I have one of thess in my "drawer of impulse shopping items" the exact same as yours i think.
It should also be possible to replace the electret mic. with a "line in" just by adding a voltage divider at the input (removing he mic)
ohh i have to experiment soon.
Mikael
|
|
|
|
Post by Morn Valley on Jan 10, 2021 11:35:08 GMT
It’s quite a versatile chip, you can even build a filter from it!
Peter Edwards has a great video of building a circuit from scratch using this chip if anyone’s interested.
|
|
|
|
Post by rodney on Jan 10, 2021 21:28:20 GMT
oooh! I forgot about that video and that this was the chip he used. I see a renaissance of Lo-Fi mayhem ahead ...
|
|
|
|
Post by keurslagerkurt on Jan 10, 2021 22:42:16 GMT
Damn, seems like i'll have to do a deeper dive and testing session with this chip! Sadly my days off are over and it's one of the busiest months of the year now over at work. So it will be at a slower pace. But i'll update here if i try new stuff, and thanks for so much useful suggestions / inspiring questions already!
|
|
|
|
Post by MikMo on Feb 20, 2021 20:37:29 GMT
So i was messing around a bit with the ISD1820 module today, and you can power an trigger it from AE, but there is a huge pop/click both when the sound starts and when it ends, so not really very useful.
|
|
|
|
Post by pt3r on Feb 21, 2021 16:08:16 GMT
Is that not something that can be fixed using a vca + env?
|
|
|
|
Post by krischo on Feb 22, 2021 20:15:25 GMT
These chips are great! I once made a LoFi Looper with 3 of those controlled by an Arduino. When you circuit bend these guys they can produce very nice and glitchy sounds especially when you interconnect them with circuit bending so they are somehow effecting each other. And I once interconnected these guys with a circuit bended Casio SK1. With some patches it went totally wild and I could actually controll the looper with the Casio.
Must be great to have them in a AE Modular! I am actually looking for just the chips like in the video from casper electronics but I just find the circuit board ones...
|
|
|
|
Post by keurslagerkurt on Feb 23, 2021 9:37:04 GMT
These chips are great! I once made a LoFi Looper with 3 of those controlled by an Arduino. When you circuit bend these guys they can produce very nice and glitchy sounds especially when you interconnect them with circuit bending so they are somehow effecting each other. And I once interconnected these guys with a circuit bended Casio SK1. With some patches it went totally wild and I could actually controll the looper with the Casio. Must be great to have them in a AE Modular! I am actually looking for just the chips like in the video from casper electronics but I just find the circuit board ones... Wow, that sounds really awesome!! I'm planning to experiment more with these guys later this year, when I have a bit less workload  I have been searching for the individual chips to, but I can't find them anywhere either, not even on AliExpress. Very weird. The board I bought does however have them in sockets, so that helps to get them out to experiment with. (but its not optimal from an economical & ecological viewpoint ofc) |
|
|
|
Post by MikMo on Feb 23, 2021 10:17:34 GMT
|
|
|
|
Post by keurslagerkurt on Feb 23, 2021 11:29:54 GMT
It has been some time since I last used it, but I think I didn't have a big issue with it. I notice that the biggest click/pop was actually the sound of my 'REC' button picked up by the microphone. I know that there was at least some glitchiness to the start/end of the recording, but not as much that they were useless to me. Big thanks for the link by the way!! |
|
|
|
Post by keurslagerkurt on Feb 28, 2021 11:40:30 GMT
Reviving this thread another time! Finally had my go with the chip on the breadboard. Took the schematics from the bastl website for a ‘modular synth’ setup. At first it didn’t work, but apparently you need to make sure you don’t make the ‘feed through’ connection, otherwise you just hear the input of the chip, not the playback (it does make sense haha). Had quite some fun repitching small sampled snippets of the AE. Pitching it down makes very gritty, cool lofi sounds. Pitching it up extremely while looping gives you a new oscillator (makes sense too!). Few things to consider when using this circuit: - It is lofi. Sometimes start & stop of the sample make a pop, sometimes it doesn’t. Not sure why, it seems pretty random. I sent my sample through the SVFilter which was perfect for getting the pop out (its more of a click really). Messing with the pitch also helps to find a sweet spot.
- If you have your pitch tweaked way down or up, it won’t make a new recording. It can be very picky on how your pitch is set to whether it wants to record. It can be frustrating and made me think multiple times that it stopped working altogether.
- Loop is not perfect. The IC makes one pin go low when the playback is finished, however, there is a small, audible gap between the audio effectively stopping and the pin going low. This makes looping not perfect, especially at lower playback rates.
- I cannot seem to find an original datasheet of the IC itself. Only datasheets from complete modules.
- The AE voltage drops to 3.8V when I connect my breadboard circuit. No clue why. I will make a seperate forum post to ask about this and how to deal with it.
I’m tempted to try and make a pcb for this chip, as I would love to have a more fixed place for this chip in my rack. I think it can be a lot of fun to trigger this chip semi-random, recording small clips of your current drones & looping them. As NightMachines suggested, two of these could make a very powerful, generative tool recording eachother and degrading, repitching, etc the sound. Exciting! However I would like to solve a few things when making a schematic, and I would be interested for other ppl’s input: - Solve the pitch recording issue. Thinking about a JFET or transistor circuit that cuts of the pitch pots when recording, so there is always a fixed resistor when recording. This requires some ‘engineering work’ that I have not done before.
- Figure out more about the voltage drop. Having the module as is in the rack, would make the AE voltage drop to 3.8V. I can’t imagine that is a good thing.
- Solving the loop issue would be cool, but I can’t imagine how to do it without a microcontroller or something. It might be easier to just use an external pulse wave that makes the recording replay before it ends. A pulse wave with a very high duty cycle at the ‘Gate playback’ would probably do the trick.
- I need to figure out an ideal recording level. Right now the input signal is attenuated too much (I think this schematic is for eurorack levels). Maybe this input volume can be controlled with a pot.
Any extra input, ideas, etc is very welcome! Here you can see my latest experimenting with the chip in action: |
|
|
|
Post by keurslagerkurt on Feb 28, 2021 16:32:32 GMT
|
|
|
|
Post by asagong on Mar 4, 2021 16:53:33 GMT
Hi...use a smartphone with a simple app to record the four preset messages, then send them via BT to a reciever, with a PICAXE to interupt the normal 'talk back' of the parrot. The gist of what I'm after is a parrot that does 'talk back', but can also be triggered to speak a few preset messages which have been recorded 'locally', i.e not requiring a PC. pcb assembly quote |
|
|
|
Post by keurslagerkurt on Mar 13, 2021 16:21:21 GMT
Found this interesting variation today: http://instagram.com/p/B_CTd8ojT2j Seems like the small transistor helper circuit at the upper left gets rid of the pop. It converts an input trigger to a short 'low' signal restarting the loop, instead of shutting the machine off and restarting. Of course you would still need to 'sequence' your trigger so the recording never reaches the complete end? |
|
|
|
Post by keurslagerkurt on Mar 13, 2021 22:40:00 GMT
Hi...use a smartphone with a simple app to record the four preset messages, then send them via BT to a reciever, with a PICAXE to interupt the normal 'talk back' of the parrot. The gist of what I'm after is a parrot that does 'talk back', but can also be triggered to speak a few preset messages which have been recorded 'locally', i.e not requiring a PC. I'm sorry but you lost me at 'PICAXE' 😅😅 i'm really not much of a digital ic guy. As I do it all for fun, I mainly like sticking to analog because it gets me away from the screen and it feels like some puzzle solving with pen and paper. Ofcourse a true sampler and sample player would be best made with some of these incredible microprocessors, but i like toying with these lofi pieces of 'almost-junk' 😁 |
|
|
|
Post by reductionist_earth_catalog on Dec 5, 2021 17:24:48 GMT
|
|
|
|
Post by keurslagerkurt on Dec 7, 2021 8:59:21 GMT
That is indeed a fantastic resource, i based my circuit in the jam above completely on this one. Copying the bastl circuit should work IIRC! If you're new to electronics, i think this is def a good place to start. You can have a lot of fun with these limited, cheap components already. Only downside is that there is not THAT much documentation on the ISD. And it makes me happy to see a new DIY face around here! AE Modular lends itself very well to breadboard experiments, it's how I really started my module making as well 😊 |
|


